Thursday, October 25, 2012

ownCloud on a Raspberry Pi

This is a project that I have wanted to do for quite a while now. I finally got a free day this previous weekend, so I thought I would dedicate a little time to playing with the Raspberry Pi. The Raspberry Pi, for those not in the know, is a $35 ARM powered computer that is about the size of an Altoids Tin. I only had a day for my project and decided that setting up ownCloud would be interesting. ownCloud is an alternative to many different cloud services, such as file storage (Dropbox, Google Drive, SkyDrive, etc.), calendars (Google Calendar, etc.), music player (Google Music), personal picture viewer (Picasa, flickr,etc), and others. It has quite a few interesting features and is very actively developed.

Setting Up the Raspberry Pi

The Raspberry Pi is surprisingly easy to set up with Raspbian, and I was off and running in no time. I would go through the details, but I followed the Raspberry Pi Wiki article on SD card setup. I was able to use SSH to login after the first boot, so I did not even have to plug it into my TV. I did not do anything special with the configuration of my Pi, but I plan on activating the turbo setting in the firmware, so I can get the processor speed up to 1Ghz.

Setting Up nginx and PHP

In order to run ownCloud, you need a webserver and PHP. Apache can be a bit big for the Pi which only has 256MB of RAM (they now come with 512MB), so I chose to install nginx and PHP-FPM
aptitude install nginx php5-fpm php5-sqlite php5-gd
 Then, create a file in /etc/nginx/sites-available/. I called mine owncloud.vhost:
# redirect http to https.
#server {
#  listen 80;
#  server_name owncloud.example.org;
#  rewrite ^ https://$server_name$request_uri? permanent;  # enforce https
#}

# owncloud (ssl/tls)
server {
  #listen 443 ssl;
  listen 80;
  #ssl_certificate /etc/nginx/certs/server.crt;
  #ssl_certificate_key /etc/nginx/certs/server.key;
  #server_name localhost;
  root /usr/share/nginx/www/owncloud;
  index index.php;
  client_max_body_size 1000M; # set maximum upload size

  # deny direct access
  location ~ ^/(data|config|\.ht|db_structure\.xml|README) {
    deny all;
  }

  # default try order
  location / {
    try_files $uri $uri/ @webdav;
  }

  # owncloud WebDAV
  location @webdav {
    fastcgi_split_path_info ^(.+\.php)(/.*)$;
    fastcgi_pass unix:/var/run/php5-fpm.sock;
    fastcgi_param SCRIPT_FILENAME $document_root$fastcgi_script_name;
    #fastcgi_param HTTPS on;
    include fastcgi_params;
  }

  # enable php
  location ~ \.php$ {
    fastcgi_pass unix:/var/run/php5-fpm.sock;
    fastcgi_param SCRIPT_FILENAME $document_root$fastcgi_script_name;
    #fastcgi_param HTTPS on;
    include fastcgi_params;
  }
}
I actually got the majority of this file from ownCloud.org. Then create a soft link to /etc/nginx/sites-enabled:

ln -s /etc/nginx/sites-available/owncloud.vhost /etc/nginx/sites-enabled/

Note: I removed the default server in sites-enabled.

I then modified /etc/php5/fpm/php.ini to include the following:

extension=sqlite.so
extension=zip.so
extension=json.so
extension=xmlrpc.so
extension=curl.so
extension=gd.so

Installing ownCloud

I downloaded the gzipped tar of ownCloud 4.5 from ownCloud.org, then decompressed it and copied it to /usr/share/nginx/www/owncloud.

Then,

sudo chown -R www-data:www-data /usr/share/nginx/www/owncloud

You should now be able to start nginx and php-fpm, then using your web browser to go to the IP address of your Pi, and BOOM! ownCloud!
Wednesday, October 10, 2012

A Simple Pump: The Idea

The Premise

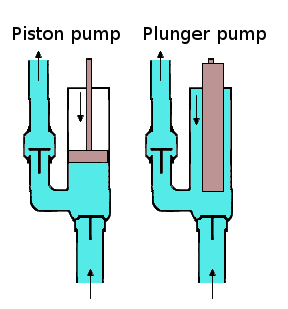
Fig. 1: A Piston Pump (left). Wikipedia
Atlanta is hot in the summer, so have a cool drink can become very necessary (especially when wearing a costume at Dragon*Con). Now, a steampunk would not be caught carrying around a CamelBak, and a canteen, while practical, is a bit boring. Why not use a pump to bring fluid from my backpack to a dispenser and maybe find a way to cool it in the process.

I want to create a piston-cylinder device (see Figure 1) to pump fluid through a cooling medium and out of a dispenser. The pump will also be powered by my flywheel. After, a bit of searching, I think I have come up with a simple, easy to build pump.

The Proposed Method

My current idea is to take an empty wine bottle, lop off the bottom, machine an airtight piston to fit inside the bottle, then run the piston using a crank arm. Figure 2 is a conceptual drawing of the idea.

Figure 2: Conceptual Sketch of A Pump.
Bottle(Green), Piston(Black),
Crank Arms(Blue), Liquid(Teal?)
As the left-side arm rotates, the piston will create pressure, forcing the fluid out of the mouth of the bottle to the right. It should also be reversible, in order to draw the fluid back into the bottle, for storage.

To cut the bottom off the bottle, I will try this tutorial from GreenPowerScience.com. They get a bit long winded in the video, but thanks to the Wadsworth Constant, you can use this link instead and skip over the fluff.

As for the piston, I have not decided on how to make that yet. I am stuck between two different options:

  1. Machine metal into shape, and use some rubber grommets to create the seal
  2. Use a 3D printer to create a piston out of ABS, then machine it to fit

I am leaning more toward #2, but then again, I just really want a Solidoodle.

The interface with the flywheel is probably going to be a combination of a pulley and belt connected to the flywheel shaft, and a worm drive connected to the crank arm. There will also need to be a reversal option available, but that might take the form of a crossed belt drive.

The Concerns

I am concerned about efficiency with this design. The input is coming from a very high rotational velocity(the flywheel) and trying to convert it to a very slow linear velocity(the crank arm). I have a feeling that this mechanism will be more of a metering device than an actual pump. It will take a bit more thought to understand how this system will function.

I will be creating another post about the math behind the pump, after a few considerations for placement and orientation. I primarily wanted to get this information out of my head.

Thursday, October 4, 2012

Mind Mapping

Since leaving Dragon*Con, I have been doing my best to keep track of all the ideas that I want to implement in my costume. In order to do that, I have been using a technique called Mind Mapping. It is a wonderful concept generation tool. If you have never tried it, then you should take a look at the Wikipedia entry, and Dr. Dobb's takes a look at the technique from a software development point of view.

The Process

Fig. 1: My Collapsed Mind Map
To outline the basics: you start with a central topic, then expand outward getting more and more detailed. As you can see in Figure 1, my central topic for this map is my Con costume. It then radiates out into the main parts of the costume. The map gets more-and-more specific about what will go into
each section, as your radiate further away from the central topic.

The Software

Fig. 2: SimpleMind Free version of my Con Costume mind map.
When I said that I have been working on this project since leaving the Con, I truly meant it. While my wife was at the wheel, I had my phone out creating the initial map. Figure 2 is a screenshot of the current (as of posting). I used SimpleMind Free for Android. It makes some very pretty mind maps, and the paid version can sync with Dropbox and export to the Freemind file format, which is kind of a universal format for mind maps. 

Once I got the initial map settled down, I went to work transcribing it into FreePlane, which is the successor of Freemind. I feel that FreePlane does not make as pretty of a mind map, as SimpleMind does, but it is opensource as well as usable on PC, Mac, and Linux. Below, in figure 3, is an example of what the FreePlane output looks like.
Fig. 3: FreePlane version of my Con Costume mind map.
Yes, I did obfuscate the further branches on both figure 2 and 3, but only to keep those subjects for later discussion.

Conclusion

Mind maps are wonderful to help document concept generation. I find myself prototyping ideas using mind maps all the time. I tend to think about all aspects of a project at once, so mind maps help me capture all of those thoughts in a coherent manner.